It will not come as a surprise to many that this year, the Warsheds haven’t seen as many games played as usual. Myself, I’ve only played a handful of games since March, and only 2 games of 9th edition in person. It does not seem likely that our team tournament will be happening any time soon. How dismal.
In researching ways we can play virtually (and following quite a few backstabbings in Among Us) I decided to bite the bullet today, and properly explore Tabletop Simulator. Here follows something of a guide to getting a game of 40K without risking inhaling your opponent’s germy, germy breath.
Prerequisites
You’re going to need:
- A computer. Ostensibly TTS will run on PC or Mac, but it uses a lot of 3D rendered objects, and your appliance of choice will need to cope with this.
- A copy of Tabletop Simulator. At the time of writing, it costs about £15 on Steam. Sales have happened in the past.
- Internet access. It wouldn’t be much use without it.
Once you have the thing installed, it’s worth taking some time to go through the tutorial, which will teach you the basics of moving around, interacting with things, picking up objects and so on. Generally speaking you can get around with W,A,S,D and a combination of holding down the right mouse button and the middle button/scroll wheel to alter the angle and direction of the camera. The scroll wheel zooms you in or out. You should also familiarise yourself with the various tools in the interface, and the various saving and loading concepts, which go beyond what you’d expect.
Briefly, you’ll want to know:
- The Tab key gives you access to a measuring tool. Hold it down to arbitrarily measure distance. Hold down tab with objects being moved to measure from their point of origin. I know, handy right?
- As well as the state of a game, you can save groups of objects. Handy for making armies. Select them in-game, right click, and you’ll find a save option on the pop up menu.
- Loading comes in several flavours. You can load a map or saved game, as you’d expect. However, in-game you can also perform an “additive load”; open up the Games dialog, as if you were loading a new game, find the things you want to add to your game (for example, your actual game map with a BTC game template loaded), click the little dots in the corner for that map, and select “additive load” and it will add that map to the current game. Really handy.
- You can also pick individual objects out of another save. If you wish to add a handful of models, you can follow the steps above, but instead pick “expand” on a save, and you’ll get a dialog with all the objects in that save. Search or pick the ones you want, and they’ll be added to your current game. This is how you’d add your army pieces to a game.
The 40K Bits
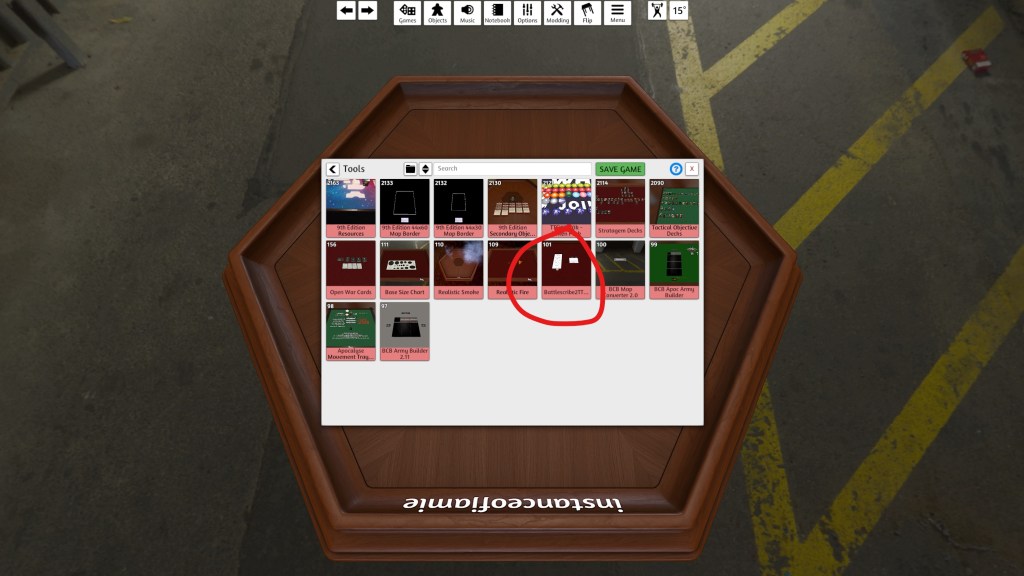
This bit’s slightly fiddly, but thankfully you’ll only need to do it once. You’re going to want to visit this Github page: https://github.com/TTSWarhammer40k/Battleforged-Workshop-Mod-Compilation and follow the instructions.
What this will do, is install a library of helpful things to help you play. Everything from the game template, which is set up for you to load maps into, to several choices of finely created maps (some of which feature things like animated fire effects, and even snow), to the assets for the models themselves. You’ll need to treat this like a library, so it might be useful to save it to its own directory, just so you don’t overwrite anything in there.
Once these are installed, it’s worth have a few practice goes at loading maps into new games, loading groups of models in, and moving them around, measuring and trying things out. In a non-destructive way, of course.
Battlescribe
Here’s where the fun begins. I’m not going to write an essay in making lists with Battlescribe, I think we all know how to do that already. But there’s a handy tool that can link your Battlescribe roster to your models in TTS. Predictably, it’s called Battlescribe2TTS.
Once you have a roster, you can head on over to https://battlescribe2tts.net, and upload the roster file. The website will give you a code.
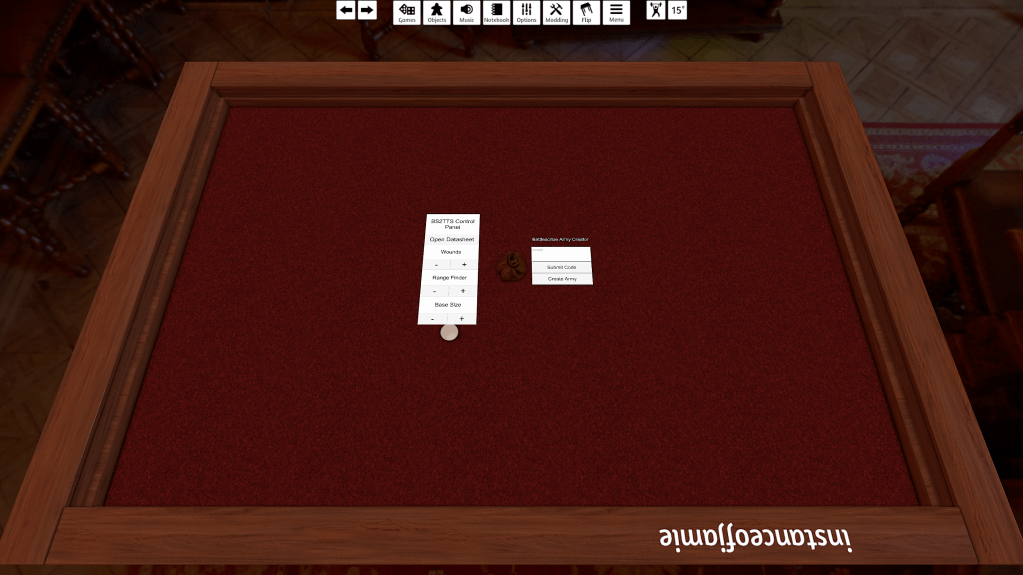
Inside TTS, you’ll need to load up the map (under maps, terrain and tools) called Battlescribe 2 TTS, which will show you a box where you can paste the code from above. Do so, and click Submit Code, and a series of big white buttons showing each unit type in your army will appear.
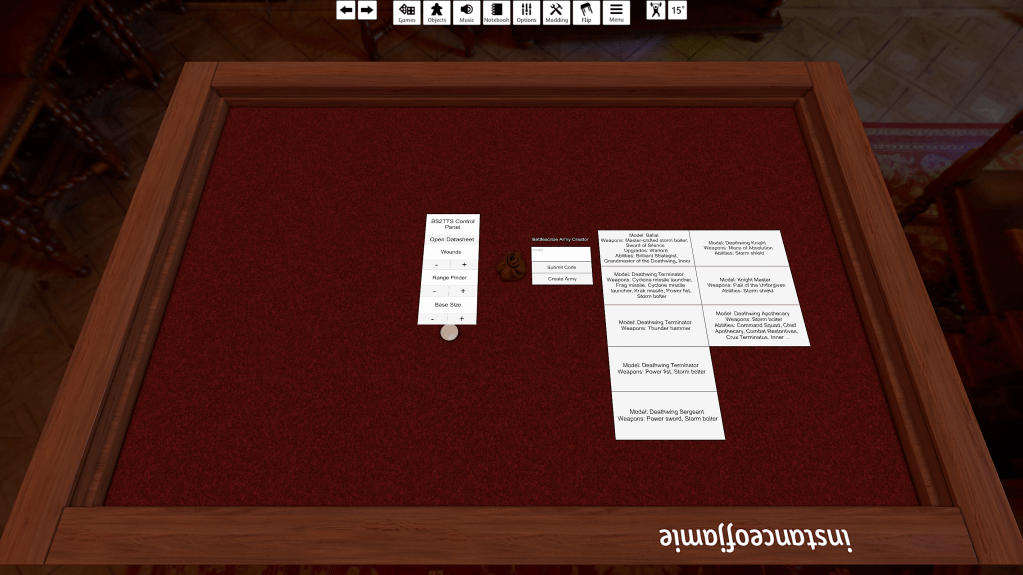
Next, load each of those unit type’s models, using the ‘expand’ method from above.
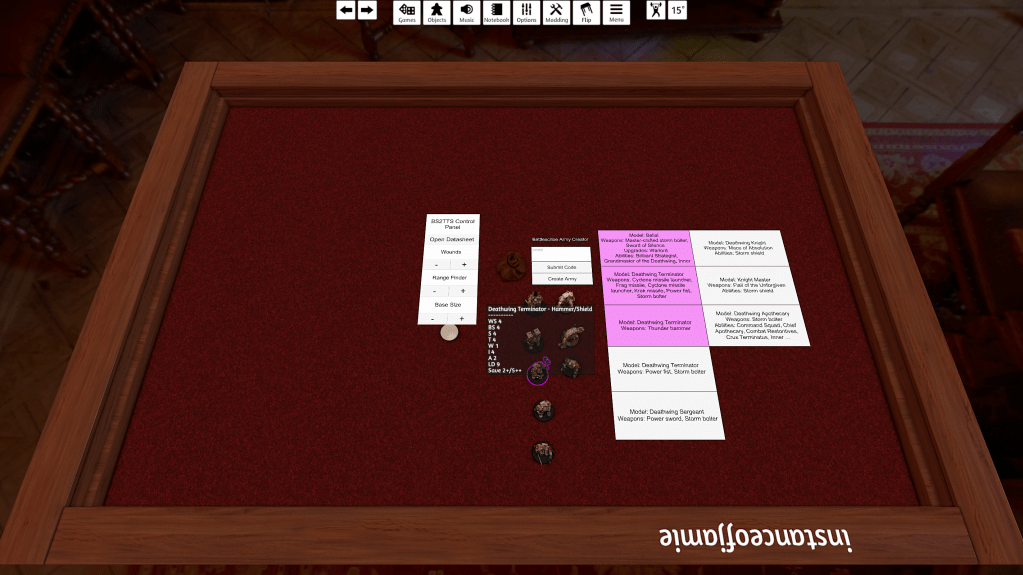
Now, click the first button. Then click the corresponding model. Boom. You just told TTS all of the information about that unit type. Follow the process for the rest of the unit types – as you do so, each button will turn pink.

Once completed, click ‘Load Army’ and your entire freaking army will be loaded before your eyes. What’s even better, is that if you hover over a model, all of its stats, weapon profiles and abilities will be shown. Handy, right? Yeah. Yeah it is.
Once you’re happy with how your army’s put together, select the whole lot and save the models. You can then load them into a game to actually play…
